Perhaps you have heard about natural dyeing and wondered what it is and how to make natural dye. If you are keen to learn about natural dyeing and how to get started with this hugely addictive hobby, you have come to the right place. This guide on natural dyeing, covers all you need to know about natural dyeing, what supplies you need, and the general process for how to make natural dye from food and foraged plants, fungi and lichen. From there you will be well equipped to experiment with natural dyeing.
- What is natural dyeing?
- Dyestuffs meaning and other technical terms
- Can you dye wool?
- What is a mordant?
- What is mordant dye?
- Dyeing equipment and supplies
- Safety considerations when dyeing
- Natural dyeing process
- Variables that affect natural dyeing results
- What can I use to make a natural dye?
- Where to buy natural dyes
- Making natural dyes from food
- Other natural dye extraction methods
- Natural dyeing courses
- Books on natural dyeing
Disclosure: This information may contain affiliate links which means if you click and buy, we may receive a small commission at no extra cost to you. See full Disclosure for details.
What is natural dyeing?
![]() Natural dye, by definition, are dyes or colorants derived from plants, invertebrates, or minerals. According to Wikipedia, most natural dyes are extracted from plants, using the roots, leaves, bark, berries and wood. Other popular plant-like sources include lichen and fungi. These dyes are non-toxic, biodegradable, and can be found in the produce section in the grocery store or out in nature, in all parts of the world.
Natural dye, by definition, are dyes or colorants derived from plants, invertebrates, or minerals. According to Wikipedia, most natural dyes are extracted from plants, using the roots, leaves, bark, berries and wood. Other popular plant-like sources include lichen and fungi. These dyes are non-toxic, biodegradable, and can be found in the produce section in the grocery store or out in nature, in all parts of the world.

Non-natural dyes are synthetic dyes. Synthetic dyes and the dying process are often very toxic for the environment and for industry workers using and inhaling these chemicals. Similarly, they are also harmful for us, as consumers, who wear dyed textiles close to our skin which readily absorbs these nasty chemicals.
Natural dyeing methods have changed little over time, and its history goes back thousands of years. Firstly, the dye extraction process involves heating natural materials, such as plant matter, in a pot of water to extract the pigment. Finally, the fibers or fabric is soaked in the dye solution until a desired colour intensity is reached. Given the simplicity of this craft, natural dyeing of fabric at home is easily achievable, inexpensive, and in many cases a kid-friendly activity.

 Note: Natural dyeing should not be confused with eco-printing , which is a process of using plant leaves to print directly onto a fabric, usually silk, by bundling the plant matter in the fabric and steaming it.
Dyestuffs meaning and other technical terms
![]() The word ‘dyestuffs’ is a technical term used to refer to the organic material that contains dye, such as plant matter, fungi, lichen, and invertebrates.
The word ‘dyestuffs’ is a technical term used to refer to the organic material that contains dye, such as plant matter, fungi, lichen, and invertebrates.

Other natural dyeing technical terms include:
Liquor: The dye solution obtained from a fermentation dye.
Dye bath: The dye solution and dye pot.
Mordant: Substances used to chemically bind the dye pigment to the fiber. They include organic and inorganic compounds.
Fixative: Fixatives make a weaker bond between the fiber and pigment.
WOF: Stands for the ‘Weight Of Fiber’ and is used in regard to the ratio of mordant to fiber for the dye recipe.
Curing: The aging of a dyed fiber after the dyeing process which allows the pigment-fiber bonds to become stronger and more established before the fiber is rinsed for the first time.
Protein fibers: Fibers derived from animals such as wool and silk.
Cellulose fibers: Fibers derived from plants such as linen, cotton, bamboo, and corn silk.
Substantive dye: A dye that binds to fiber and maintains its colour over time and is considered permanent. Many of these dyestuffs are high in tannins which is a natural fixative and thus they don’t need a mordant.
Adjective dye: A dye that needs a mordant to permanently dye the fiber.
Fugitive dye: A dye that does not bind to the fiber. The fiber will lose the dye with the first rinse, or if the dye is semi-permanent it will fade over time.
Lightfast: The dye won’t fade when exposed to the sun. This can be achieved by using a mordant or may already be a property of the dyestuffs.
Colourfast: The dye won’t fade when washed frequently. This can be achieved by using a mordant or may already be a property of the dyestuffs.
Exhaust: The number of times a dyebath is used. The first time the dye is used is called the first exhaust, this usually yields the most intense colour. Subsequent uses of the dyebath (second exhaust etc.) give paler results.
Tanning: Using tannins from plant matter as a mordant (e.g. tree bark).
Assists and modifiers: You may use the same substance as an assist or modifier but they both refer to difference things. An assist helps the mordant or dye to preform properly (e.g. Cream of tartar prevents alum from clumping). In contrast, A modifier changes the pH of the dye bath to produce a different colour.
Overdyeing: Overdyeing is the equivalent of mixing colours, the only difference is that the dyeing of each colour are separate steps. However, the principle is the same, if you dye a fiber blue (for instance using indigo) then after it is cured you re-dye the fiber with yellow (for instance using marigold), you will get a green coloured fiber or fabric.
Can you dye wool?
![]() Yes, you can dye wool. Dyeing wool with natural dyes is much easier than for other natural fibers in fact. Unlike plant fibers, which are cellulose based, wool is protein based, and these proteins in the wool naturally bind really well to the pigment that makes up a dye.
Yes, you can dye wool. Dyeing wool with natural dyes is much easier than for other natural fibers in fact. Unlike plant fibers, which are cellulose based, wool is protein based, and these proteins in the wool naturally bind really well to the pigment that makes up a dye.

 Tip: If you are a beginner to the world of natural dyeing, wool is a great place to start because of how well it takes up dye. However, there is an added complication with wool, and that is the fact that given heat and agitation, wool will felt. Therefore, it is very important that while you are dyeing wool, you must not disturb the fibers.
Note: When dyeing any fiber, including cotton and linen, make sure that the fabric is not a synthetic blend. You will need the fiber to be 100% pure, and for cotton and linen organic is recommended as the processing of non-organic cotton and linen introduces a lot of chemicals that inhibit the take up of dye (although those chemical can be removed for the most part by washing the fabric before dyeing).

What is a mordant?
![]() Most mordants that you can purchase are metallic salts, such as alum, iron, tin
Most mordants that you can purchase are metallic salts, such as alum, iron, tin, chrome and copper
, these are inorganic compounds. There are also organic compounds found in plants that can be used too, such as tannins and oxalic acid. The purpose of a mordant is to fix the pigment to the fibers permanently so they do not wash away after the dyeing process or fade in the sun. Chemically, this is achieved because the mordant and dye form an insoluble compound in the fiber.
Tip: Alum is a popular inorganic mordant that is relatively safe compared to other metallic mordants, it is very effective, inexpensive, and very popular – most natural dyeing recipes call for pre-mordanted wool or other fibers with alum.
Dyeing wool without a mordant is possible if you are using a substantive dye, which is one that is readily taken up by fibers and won’t immediately fade. However, a mordant really helps keep the pigment bound to the fibers in the long term, specially for fugitive dyes, which are not permanent. In other words, using a mordant is particularly important if you plan to wash your dyed item regularly.
Note: Some resources may suggest using vinegar as a mordant to bind the dye, but vinegar is not as good as alum and is not considered a true mordant.

Mordants are not the same as fixatives. Fixatives will not bind the pigment as powerfully as a mordant, but they are generally less toxic. Vinegar, salt, tara powder, cream of tartar, and washing soda are all fixatives.

What is mordant dye?
![]() There is no such thing as a mordant dye per se, however, mordants can act as modifiers to the dye. For instance, if you use turmeric to dye some wool you will get bright yellow. If you then take your dyed wool, and place it in a solution of iron or copper the colour will change. An iron modifier makes the colour darker. Other modifiers include rhubarb, tin, and washing soda.
There is no such thing as a mordant dye per se, however, mordants can act as modifiers to the dye. For instance, if you use turmeric to dye some wool you will get bright yellow. If you then take your dyed wool, and place it in a solution of iron or copper the colour will change. An iron modifier makes the colour darker. Other modifiers include rhubarb, tin, and washing soda.
How to make iron and copper mordants
![]() To make an iron or copper mordant modifier, take some iron (like iron chain or nails) or copper and place them in a glass jar. Add a ratio of 1 part vinegar to 2 parts water. Leave the solution to react with the iron before using it (a few days at least). Although this method works well, there is no way of knowing exactly how much iron or copper is being added to the fiber, and less is better than more to reduce the risk of damaging the fibers.
To make an iron or copper mordant modifier, take some iron (like iron chain or nails) or copper and place them in a glass jar. Add a ratio of 1 part vinegar to 2 parts water. Leave the solution to react with the iron before using it (a few days at least). Although this method works well, there is no way of knowing exactly how much iron or copper is being added to the fiber, and less is better than more to reduce the risk of damaging the fibers.

Tip: As the mordant ages, you will get bits of rust floating around the solution. To avoid getting any rust in your dye or fibers, strain it through a coffee filter.

![]() Warning: Handling rusty homemade mordants is inexpensive and fun to experiment with but you run the risk of getting tetanus. Furthermore, too much metallic salt will damage your fibers over time but using the correct amount will not. Given this, you many want to consider buying your mordants instead, which can be weighed out, rather than trying to make it from vinegar, water and iron or copper metal.
Warning: Handling rusty homemade mordants is inexpensive and fun to experiment with but you run the risk of getting tetanus. Furthermore, too much metallic salt will damage your fibers over time but using the correct amount will not. Given this, you many want to consider buying your mordants instead, which can be weighed out, rather than trying to make it from vinegar, water and iron or copper metal.
Dyeing equipment and supplies
![]() Dye pot
Dye pot![]() Gloves
Gloves![]() Safety glasses
Safety glasses![]() Apron
Apron![]() Face mask
Face mask![]() White ladle
White ladle![]() Colander
Colander![]() Gauze or muslin
Gauze or muslin![]() Tongs
Tongs![]() Portable hot plate or stove
Portable hot plate or stove![]() Thermometer
Thermometer![]() Notebook
Notebook![]() pH strips
pH strips ![]() Mordants or fixatives
Mordants or fixatives![]() Fibers and fabrics
Fibers and fabrics![]() Modifiers
Modifiers

Supply notes
![]() A white ladle will show you the true colour of your dye in the dye bath.
A white ladle will show you the true colour of your dye in the dye bath.![]() The colander and gauze are for straining your dye solution.
The colander and gauze are for straining your dye solution.![]() Portable hotplate or stove is used for preparing mordants and dyes outside.
Portable hotplate or stove is used for preparing mordants and dyes outside.![]() A thermometer helps to keep track of the temperature of the dye bath.
A thermometer helps to keep track of the temperature of the dye bath.![]() Notebook – keeping notes is important for replicating your results.
Notebook – keeping notes is important for replicating your results.![]() pH strips are useful for determining the exact pH of the dye bath.
pH strips are useful for determining the exact pH of the dye bath.![]() The most commonly used pre-mordant is alum.
The most commonly used pre-mordant is alum.![]() Fibers and fabrics include wool, yarn (pure wool), silk, linen, and cotton.
Fibers and fabrics include wool, yarn (pure wool), silk, linen, and cotton.![]() Modifiers change the colour of the dye. They include modifying mordants, and pH altering substances.
Modifiers change the colour of the dye. They include modifying mordants, and pH altering substances.
Safety considerations when dyeing
![]() Toxic substances: Chrome and lead mordants are particularly toxic so it is recommended not to use them at all. Tannic acid is often sold as a source of tannins for dyeing; however, it is very toxic. There are many natural sources of tannins that are readily available for your use instead.
Toxic substances: Chrome and lead mordants are particularly toxic so it is recommended not to use them at all. Tannic acid is often sold as a source of tannins for dyeing; however, it is very toxic. There are many natural sources of tannins that are readily available for your use instead.
![]() Dyeing area: Many dyes and mordants when heated release vapours that are harmful if inhaled. For this reason, you should dye in a well ventilated area or outside.
Dyeing area: Many dyes and mordants when heated release vapours that are harmful if inhaled. For this reason, you should dye in a well ventilated area or outside.
 Dyeing equipment: Never use your dye equipment for anything other than dyeing, especially not to cook with. Although many natural dyes are safe to release into the environment and to wear next to your skin, they are not safe to consume.
![]() Protective gear: Wearing safety glasses, a mask, and rubber gloves, long sleeves and an apron will reduce the risk of getting mordant or dye in or on your person.
Protective gear: Wearing safety glasses, a mask, and rubber gloves, long sleeves and an apron will reduce the risk of getting mordant or dye in or on your person.

Natural dyeing process
Step 1. Gather equipment
Depending on the instructions you are following, it is best to gather everything you need before you begin, so you don’t realize halfway through you are missing something. If you are experimenting with dyeing, use the supply list given above.

Step 2. Prepare the wool/fiber
![]() Preparing the wool and fiber includes making sure they are free of dirt and chemicals. Before dyeing it, you may need to give the fiber a good wash with soap (a process called scouring). If you are cleaning wool, make sure not to felt it by scrubbing it with warm soapy water. Soaking wool is a preferable method for cleaning.
Preparing the wool and fiber includes making sure they are free of dirt and chemicals. Before dyeing it, you may need to give the fiber a good wash with soap (a process called scouring). If you are cleaning wool, make sure not to felt it by scrubbing it with warm soapy water. Soaking wool is a preferable method for cleaning.
Once the fiber is clean, soak it in water over night so the fibers absorb the water. This will ensure an even dye colour in your fiber.

Step 3. Determine fiber to mordant and dye ratio
![]() The mordant to fiber ratio will depend on the fiber and mordant you wish to use to bind the pigment during the dyeing process. Here are some directions for different mordants and fibers. Note that soy milk is not as effective as a mordant and is only used for cellulose (plant-based) fibers as a pre-treatment before using a mordant.
The mordant to fiber ratio will depend on the fiber and mordant you wish to use to bind the pigment during the dyeing process. Here are some directions for different mordants and fibers. Note that soy milk is not as effective as a mordant and is only used for cellulose (plant-based) fibers as a pre-treatment before using a mordant.
![]() Wool fiber and alum mordant – use 10% WOF (weight of fiber) for the alum amount.
Wool fiber and alum mordant – use 10% WOF (weight of fiber) for the alum amount.![]() Rhubarb mordant – check out this recipe
Rhubarb mordant – check out this recipe![]() Linen and cotton and soy milk binder – check out this recipe
Linen and cotton and soy milk binder – check out this recipe![]() Linen and cotton mordant – use 15% WOF (weight of fiber) for the alum amount.
Linen and cotton mordant – use 15% WOF (weight of fiber) for the alum amount.

Step 4. Prepare the mordant
![]() To prepare the mordant, measure out the 10 – 15% WOF of alum to your dye pot. Then add a cup or two of boiling water to the dye pot and stir until the crystals have dissolved. Next, top the dye pot up with cold water, until it is half full. The temperature needs to be roughly the same as that of the wool fiber, otherwise it may felt your wool.
To prepare the mordant, measure out the 10 – 15% WOF of alum to your dye pot. Then add a cup or two of boiling water to the dye pot and stir until the crystals have dissolved. Next, top the dye pot up with cold water, until it is half full. The temperature needs to be roughly the same as that of the wool fiber, otherwise it may felt your wool.
Tip: Although alum is not considered particularly dangerous, it is still advisable to wear protective gear such as gloves and safety glasses.
Step 5. Natural dye extraction method
![]() Generally, you will need to simmer the dyestuffs for at least an hour to extract the dye. However, there are some dyes that are extracted using cold water, such as black beans. Also, there are some dyes that will change colour if you boil the dyestuffs, such as avocado skins and pits. In general, do not boil dyestuffs, just simmer and soak the dyestuffs for optimal dye extraction until the intensity of the colour stops increasing.
Generally, you will need to simmer the dyestuffs for at least an hour to extract the dye. However, there are some dyes that are extracted using cold water, such as black beans. Also, there are some dyes that will change colour if you boil the dyestuffs, such as avocado skins and pits. In general, do not boil dyestuffs, just simmer and soak the dyestuffs for optimal dye extraction until the intensity of the colour stops increasing.

Step 6. Dye the fiber
![]() Once the dye has leached out into the water and has cooled down to the same temperature as the fiber, you can remove the dyestuffs and add your fiber. Then place the dye pot back on the stove and bring the temperature back to a simmer. Simmer until the fiber has reached a colour intensity you are happy with. An hour is usually the maximum time needed, but more time won’t hurt.
Once the dye has leached out into the water and has cooled down to the same temperature as the fiber, you can remove the dyestuffs and add your fiber. Then place the dye pot back on the stove and bring the temperature back to a simmer. Simmer until the fiber has reached a colour intensity you are happy with. An hour is usually the maximum time needed, but more time won’t hurt.

Tip: If the dye bath hasn’t been exhausted and the water still has dye in it, you can add more fiber and continue dyeing. The colour of the second batch won’t be as intense as the first, but it is a good way to make the most of your dye bath.
Step 7. Cure the fiber
After your fiber has been dyed, leave it to cool and soak over night. The next day, take the fiber out and wring it out. Then let it dry in a shaded area to cure for a few days. The curing process ensures that the pigment binds to the fiber. After this time your dye will be fixed and you can rinse it.

Step 8. Rinse the fiber
![]() Rinse the fiber with fresh, room temperature water. If you will be washing your fiber (like cotton and linen) regularly with other clothes, using a pH neutral soap in this step is recommended to get all the unbound dye out of the fiber. This will prevent accidentally staining other clothes in the same laundry wash. Rinse until the water runs clean and leave to dry.
Rinse the fiber with fresh, room temperature water. If you will be washing your fiber (like cotton and linen) regularly with other clothes, using a pH neutral soap in this step is recommended to get all the unbound dye out of the fiber. This will prevent accidentally staining other clothes in the same laundry wash. Rinse until the water runs clean and leave to dry.

Step 9. Use the dyed fiber
![]() Once the dyed fiber is cured and dried it can be used for many things, such as wet felting, needle felting, weaving, or spinning into yarn. You can also blend your wool fiber with other colours, and other luxury fibers such as bamboo, viscose, and mulberry silk for instance. If after the dyeing process the fibers have clumped together it may be necessary to card the wool using hand carders or a drum carder.
Once the dyed fiber is cured and dried it can be used for many things, such as wet felting, needle felting, weaving, or spinning into yarn. You can also blend your wool fiber with other colours, and other luxury fibers such as bamboo, viscose, and mulberry silk for instance. If after the dyeing process the fibers have clumped together it may be necessary to card the wool using hand carders or a drum carder.
Overdyeing is another fun option to experiment with to create new colours. Just take your dyed fiber and re-dye it with a different coloured dye to mix the two.

Variables that affect natural dyeing results
There are many variables that affect the end results of a dye experiment, and getting the same result twice is near impossible. Variables include: water properties such as pH, minerals and dissolved gasses in the water; dyestuff freshness and variety; dye bath temperature and length of soaking; the type fibers you want to dye; whether you use a mordant and what type; and the concentration of the dye to fiber ratio.
Given all the variables that could cause unexpected results, it is best to approach natural dyeing without expectations of obtaining a particular result. If it doesn’t work out for you the first time, try altering one of the above variables such as using bottled water instead of tap water. Another thing to keep an eye on is the temperature you heat your dye to and the pH of the dye bath. Lastly, document these variables and compare them to recipes online that others have had success with.
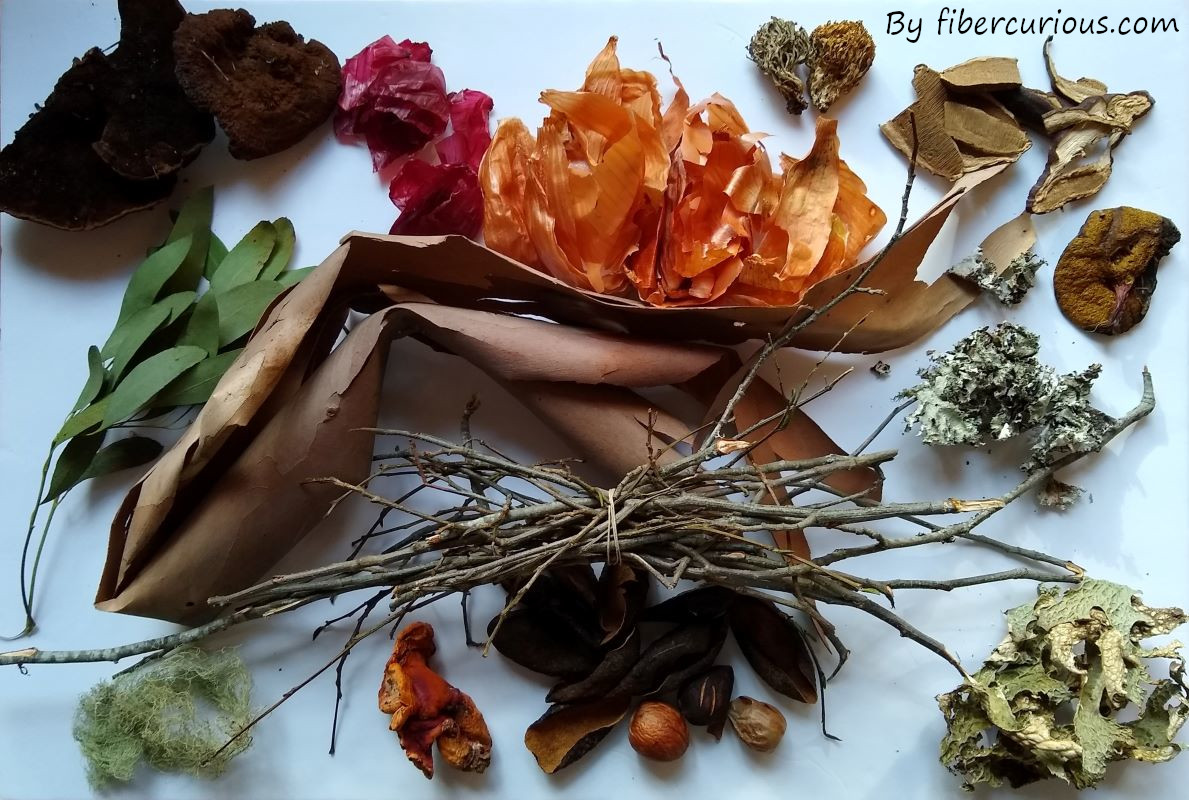
What can I use to make a natural dye?
![]() Here is a non-exhaustive list of some dye materials:
Here is a non-exhaustive list of some dye materials:
![]() Yellow – turmeric, pomegranate, marigold, Queen Anne’s Lace
Yellow – turmeric, pomegranate, marigold, Queen Anne’s Lace![]() Red – lobster mushroom, madder root, cochineal
Red – lobster mushroom, madder root, cochineal![]() Orange – Eucalyptus leaves, brown onion skins, Giant Coreopsis
Orange – Eucalyptus leaves, brown onion skins, Giant Coreopsis![]() Pink – rose, avocado
Pink – rose, avocado![]() Blue and purples– indigo, lichen, black beans, log wood
Blue and purples– indigo, lichen, black beans, log wood![]() Green – Spinach leaves, nettle leaves, chamomile leaves, yarrow flowers
Green – Spinach leaves, nettle leaves, chamomile leaves, yarrow flowers![]() Brown – walnut husks, oak bark, dandelion roots, woody stems of ivy, birch bark,
Brown – walnut husks, oak bark, dandelion roots, woody stems of ivy, birch bark,![]() Grey and black –oak galls, iris roots
Grey and black –oak galls, iris roots
Where to buy natural dyes
![]() If you are looking for something quicker with more reliable results, you can buy natural dyes from Amazon such as cochineal.
If you are looking for something quicker with more reliable results, you can buy natural dyes from Amazon such as cochineal.
For other great natural dye colours head to Maiwa, you will not be disappointed with their variety of natural dyes.
Making natural dyes from food
![]() Many safe natural dyes can be made from food dyestuffs, however, not all of them are created equal when it comes to colourfastness. Unfortunately, many dyes wash out as soon as the wool or fabric are rinsed. However, if you are dyeing easter eggs, this may not be a problem as they won’t need rinsing and are only a temporary decoration. Below is a list of food dyestuffs that are give good results and another list of food dyestuffs that rinse out immediately.
Many safe natural dyes can be made from food dyestuffs, however, not all of them are created equal when it comes to colourfastness. Unfortunately, many dyes wash out as soon as the wool or fabric are rinsed. However, if you are dyeing easter eggs, this may not be a problem as they won’t need rinsing and are only a temporary decoration. Below is a list of food dyestuffs that are give good results and another list of food dyestuffs that rinse out immediately.

Things that work well:
Tea (brown)
Coffee (brown)
Avocado (pink)
Onion skins (orange and yellow)
Black beans (blue)
Lobster mushrooms (red)
Things that don’t work well:
Berries (pink to purple)
Red Cabbage (purple)
Red Beet roots (magenta)
Other natural dye extraction methods
Fermentation dyeing
![]() Fermentation dyeing is the process of extracting dye by letting the dyestuffs sit in a jar and ferment. Over the course of a few weeks, as the dyestuffs ferment, the dye is released. Depending on the dyestuffs, pre or post heating may facilitate dye extraction. Fermentation dyeing takes much longer than the normal dye extraction method, however it often involves less chemicals and processing over a stove, which can be safer for children. For fermentation dyeing recipes, check out Suzanne Dekel’s blog.
Fermentation dyeing is the process of extracting dye by letting the dyestuffs sit in a jar and ferment. Over the course of a few weeks, as the dyestuffs ferment, the dye is released. Depending on the dyestuffs, pre or post heating may facilitate dye extraction. Fermentation dyeing takes much longer than the normal dye extraction method, however it often involves less chemicals and processing over a stove, which can be safer for children. For fermentation dyeing recipes, check out Suzanne Dekel’s blog.
Solar dyeing
![]() Solar dyeing with plants and lichen, is much like fermentation dyeing. Instead of bringing the dyestuffs to a high temperature on a stove, the dyestuffs are placed in a jar and steeped in water in full sunlight. The warmth of the sun facilitates the extraction of the dye into the surrounding water. For solar dyeing recipes, check out La Creative Mama.
Solar dyeing with plants and lichen, is much like fermentation dyeing. Instead of bringing the dyestuffs to a high temperature on a stove, the dyestuffs are placed in a jar and steeped in water in full sunlight. The warmth of the sun facilitates the extraction of the dye into the surrounding water. For solar dyeing recipes, check out La Creative Mama.
Natural dyeing courses
 There are lots of options when it comes to taking an online course in natural dyeing. Here are a few to get you started in your search:
![]() Natural dyeing bootcamp, by All Natural Dyeing
Natural dyeing bootcamp, by All Natural Dyeing
![]() Home-study core skills in natural fabric dyeing, by The Wild Dyery
Home-study core skills in natural fabric dyeing, by The Wild Dyery
![]() Natural Dyeing Course, by Mentoring for Creatives
Natural Dyeing Course, by Mentoring for Creatives
Books on natural dyeing
If you are interested in learning more about natural dyeing, check out these books The Wild Dyer by Abigail Booth, Natural Color by Sasha Duerr, and A Garden to Dye For by Chris McLaughlin.


Be the first to leave a comment