If you want better wet felting precision and reliable results you need to start using prefelts. Coming up with a wet felting design and a plan before you begin will reduce the chance of disappointing results. Using prefelt in your felting will help sharpen your image and keep your edges crisp.
In this tutorial on how to use prefelt, I cover the importance of felting design, how to plan a complex wet felting project, and provide three examples of different project complexities to illustrate the level of planning needed for each. Please feel free to use these examples for your own wet felting project ideas.
Disclosure: This information may contain affiliate links which means if you click and buy, we may receive a small commission at no extra cost to you. See full Disclosure for details.
The importance of felting design
Doing a few sketches to visualize your felting project can be a great way to get the creative juices flowing and do a brain dump of all those amazing wet felting project ideas before they dry up. Then when it is time to felt there is no pressure to be spontaneously creative and know the exact pattern or colour you want – it is already written down. Just like a painter faced with a blank canvas or an actor on stage, having a plan is important to avoid a block or stage fright.
Having the details of complex felting projects written down is also helpful for avoiding costly mistakes and having to start over. Things like dimensions or weights of wool, spacing, and exact shapes. Sometimes ‘winging it’ works out but often that only comes with practice, and in the meantime, planning and good design are a sure way to felting success.
What is a prefelt?
A prefelt is a piece of slightly felted wool that has just begun to felt, when the process is ended. The fibers at the surface of the wool have begun to interlock but only loosely, and the fibers in the middle have not at all. The piece has not shrunk or thickened (a process known as fulling the felt). It is at this stage that the felt can be used in other felting projects and still reliably felt to other wool fibers.

How to use prefelt in your felting projects
You can buy prefelts or create your own. There are quite a few retailers on Etsy selling prefelt. The prefelt can be cut into shapes and laid on prefelted or unfelted wool. Alternatively, you can use it like a wool canvas and lay a wool design on it and felt it that way. In this tutorial, I will be discussing and demonstrating the former method of cutting colourful prefelt into shapes and laying them on unfelted wool that has been wet down. If you would like to learn how to make prefelt see How to make prefelt for your felting projects.
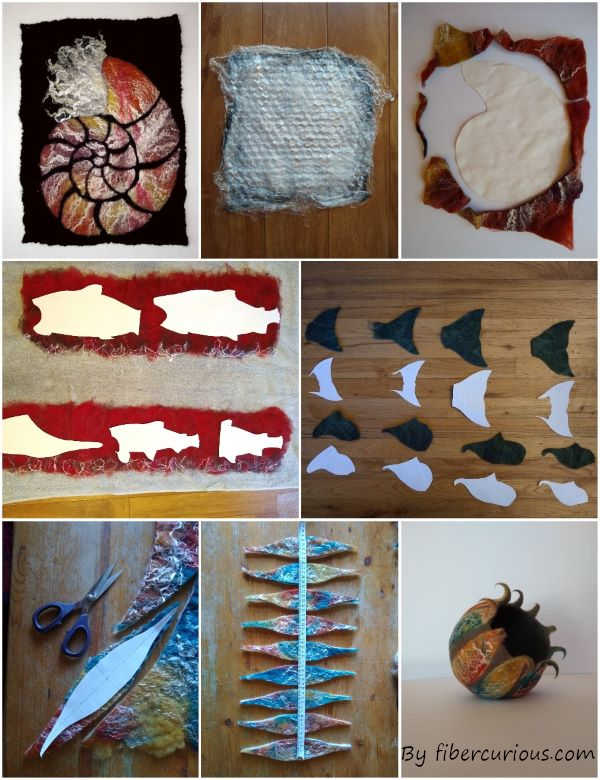
Example 1. Nautilus wall hanging

This prefelt design is fairly simple. I made a single multi-coloured prefelt, cut it into predetermined shapes, then laid it down on a black merino wool background that I had wet down first. I then added some curly locks and silk top for the tentacles and felted it as normal (if you would like guidance on how to felt, check out Wet felting for beginners – your step by step guide to wool felting).
Step 1. Drawing the design

Using photos of nautilus , I created a stylized spiral pattern which I sketched on some paper. I knew I wanted to cut the prefelt into sections, so I needed to figure out the best way to do that with the nautilus. Using photos of the inside of a nautilus, which is separated into chambers gave me the answer I needed. Mimicking this, I drew these chambers, and then traced over the drawing using tracing paper . I then flipped the tracing paper over onto a blank sheet of paper and drew over the lines to make an imprint on the paper. I then numbered the chambers so I would remember their order once cut out. Then I cut each section out and arranged them back into their spiral image.
Step 2. Cutting the pre-felt

Using the outline of the original drawing, I cut the shape out of the prefelt. This can be done by pinning the paper to the prefelt, drawing around the paper on to the prefelt with chalk, or just cutting around the paper and being really careful not to move the paper while doing so. I then cut out each section of the shell from the prefelt outline shape, starting with the biggest and working inwards towards the middle of the spiral, laying each out into the spiral image as I went. I will mention that it is very important to use a sharp scissors for cutting the prefelt, as a blunt one will pull the fibers out. Never use your sharp scissors to cut anything other than wool or fabric (not even paper) or it will get blunt very quickly.
Step 3. Laying out the felting
Once you have each segment cut out, lay out a black background using merino felting wool. Then lay out the bits of nautilus shell with a small gap between each piece. My sections were 3 mm – 10 mm apart, the widest gaps between the largest sections and the smallest gaps at the center of the spiral. I then placed the curly wool locks and mulberry silk fiber at the shell mouth and tucked it under the edge. I then the normal felting method.

Example 2. Sockeye salmon run felted wall hanging

This wet felting project was more complicated than the nautilus. It took much more time to design, make the prefelts for, and to felt.
Step 1. Drawing a felted image

Just as I had done with the nautilus, I first drew the picture I wanted to felt (if you’re in need of a picture to copy take a look at google images for some awesome ideas you can use in your wet felting). I then used tracing paper to draw the exact same image out on another piece of paper (if you have access to a photocopier you could use that instead).

I then cut all the sections of the salmon out (the heads, jaws, bodies and tails).

I then grouped the heads with the heads and tails with the tails, etc., and determined how big I needed the prefelt for each to be. Upon calculating this, I made rectangular paper templates to use under my solar pool cover felting mat as a guide.

Step 2. Pre-felt planning
There were 4 separate prefelts; I made the yellow eyes, the green heads and tails, the red bodies, and the white jaws.

One trick I always use when making pre-felts is to make the prefelt larger than necessary in case I cut a shape out wrongly and need back up prefelt to cut out another. I used this back up strategy for the red body of one fish because I had laid the paper shape upside down on the prefelt and cut it facing the wrong way! With prefelt to spare, I was able to cut it out a second time with the paper facing the right way. The take home lesson is have backup prefelt and always label your paper shapes with a clear indicator on the front so you don’t accidentally place it down the wrong way (I would have gotten away with the mistake if I hadn’t used green on the back of the prefelt).

Step 3. Prefelt colour
I didn’t use a single solid colour for any of the prefelts. I used various dyed wool hues and blended colours to give it depth. I researched sockeye salmon breeding coloration and saw that they had a lot of mottled grey near their undersides, so I added grey to the bottom of the prefelts. This informed the shape of the prefelt that I needed. The prefelts needed to be long narrow rectangles, so that each body part would get some grey mottling near the underside. I lined up each body part in a single row and determined the height and width of each prefelt rectangle. Once I had the prefelt body parts made and cut out, I tackled the background. The background river colour was informed using river images from google , and then a mixture of blue wool and mullberry silk fiber was hand carded to get the aquatic blue effect needed.

Step 4. Laying out the prefelts and felting

I then put it all together, laying out each piece and then felting very gently to make sure nothing moved during the process. For the first 10 minutes I frequently lifted the solar pool cover up to check that nothing had moved, if it had, I moved it back into its correct place. Moving anything, once it is felted in place, is a bad idea. After a certain point it won’t take to the felt anymore, but within the first 10 minutes of felting you should be okay to moving things as needed. Felt gently so things do not migrate, and use warm water, not hot. This will slow the felting process so you can easily manage where each pre-felt shape get positioned and stays positioned.

Example 3. Felting 3D objects using prefelts

I’ll finish off with the most advanced felting example, using a combination of 3D felting techniques and prefelt design. I won’t discuss how to felt the round 3D shape, but if you are interested in this wet felting project instructions, go to Wet felting on a ball. I will, however, discuss creating this felted vessel design, and attaching the prefelts during the felting process (that step is not included in the tutorial).
Step 1. Drawing the felted vessel

Everything begins with a drawing, and although I wanted this vessel to mimic sea anemone tentacles around the edge of the opening, I wanted it to be highly stylized. I needed to know how many prefelt sections to make so that there was a small gap between each at the equator of the sphere. This involved some simple math. The rubber ball I used was 50 cm in circumference, and I wanted each section to be 1 cm apart, and I wanted each section to be roughly 4 cm at their widest point in the middle. That added up to 10 prefelt sections of 4 cm width. Using these dimensions, I drew the prefelt template on paper and cut it out.

Step 2. Felting the vessel
I made a pre-felt large enough for extra sections if I needed them. I used a white background to give the pre-felt a border once it was felted in. This helped the prefelt pop out from the background.

When the prefelts were done, I added grey wool to the rubber ball and wet it down.

I then lay out a plastic bag and added the prefelts flat in the pattern I wanted on the ball.

I placed the ball on top and wetted it all down with hot soapy water, then tightly wrapped a plastic bag around the ball and tied it at the top.

After rubbing and rolling, when the prefelts were felted on, I cut an opening around the top of the ball and excluded the prefelt as they would form the tentacles.
I then felted as normal and shaped the tentacles at the end by rolling them between the palms of my hand and curling them around my finger.

Other felting tutorials you might be interested in
I hope you enjoyed this tutorial and now have tons of ideas for how to use prefelts. Don’t forget to keep your prefelt scraps, they make great designs on felted soap bars and dryer balls. Other tutorials that you might be interested in are:


More tips for using pre-felt
If you’re looking for more tips on how to create and use pre-felted wool, check out ‘How to felt the pre-felt’ on the Dyeing House Gallery website. Heidi feathers also has some good information about working with pre-felt.
Be the first to leave a comment