Dyeing wool with turmeric is an easy and fool-proof way to achieve astounding results in your natural dyeing experiments. You will not be disappointed with the rich golden yellow colour you end up with. This beginner and kid-friendly natural dyeing tutorial is the perfect gateway into natural dyeing. You will learn how to make and use a non-toxic mordant to bind the turmeric pigment to the wool, how to prepare the dye, how to dye and cure the wool, and finally I will provide you with some fun ways to use your wool after you have dyed it.
Disclosure: This information may contain affiliate links which means if you click and buy, we may receive a small commission at no extra cost to you. See full Disclosure for details.
![]() Warning: Turmeric is not a lightfast dye, which means over time it will fade. This depends on much the dyes fabrics are exposed to the sun. Although, using a mordant decreases how fast this happens, it will eventually happen. When it does you will need to re-dye your material again, usually annually. For this reason, I recommend using your wool to create a single item so this can be done easily.
Warning: Turmeric is not a lightfast dye, which means over time it will fade. This depends on much the dyes fabrics are exposed to the sun. Although, using a mordant decreases how fast this happens, it will eventually happen. When it does you will need to re-dye your material again, usually annually. For this reason, I recommend using your wool to create a single item so this can be done easily.
Dyeing wool with turmeric instructions
 Tip: If are new to dyeing and would like to know more about natural dyeing terminology, general process of natural dyeing and what mordants are, check out What is natural dyeing and how to make natural dye. You will also learn how to make your own mordant and source other natural dyestuff for your next exciting natural dyeing project.
 Note: The entire process will take a few days to complete.
For this wool dyeing method will need
![]() Fiber (I recommend white roving, white yarn
Fiber (I recommend white roving, white yarn)
![]() Alum powder
Alum powder![]() Cream of tartar
Cream of tartar![]() Ground turmeric
Ground turmeric ![]() Weighing scales
Weighing scales![]() Dye pot
Dye pot ![]() White ladle
White ladle![]() Colander and bucket
Colander and bucket![]() Gauze
Gauze![]() Tea towel
Tea towel![]() Rubber gloves
Rubber gloves![]() Apron
Apron![]() pH neutral soap
pH neutral soap
Supply notes:![]() Silk, linen, and cotton yarn and fabric will also work
Silk, linen, and cotton yarn and fabric will also work ![]() Cream of tartar has a brightening effect on the colour
Cream of tartar has a brightening effect on the colour![]() Use an old pot that will be dedicated to dyeing and not used for cooking
Use an old pot that will be dedicated to dyeing and not used for cooking![]() A white ladle lets you see the true colour of the dye as it cooks
A white ladle lets you see the true colour of the dye as it cooks![]() A colander and bucket is used for filtering the turmeric dye bath, the colander is first lined with gauze and then a second filtration is done with a tea towel
A colander and bucket is used for filtering the turmeric dye bath, the colander is first lined with gauze and then a second filtration is done with a tea towel![]() Gloves will prevent your hands from being stained yellow by the turmeric
Gloves will prevent your hands from being stained yellow by the turmeric![]() An apron will prevent your clothes from being stained
An apron will prevent your clothes from being stained![]() A pH neutral soap is used to rinsing out the dye after curing it. A soap pH that is not neutral will eventually damage the fibers.
A pH neutral soap is used to rinsing out the dye after curing it. A soap pH that is not neutral will eventually damage the fibers.
Directions
Step 1. Prepare the yarn
![]() Skip this step if you are not using yarn. To dye yarn, you much wind the yarn into a ‘hank’ or loop of wool to ensure even dyeing while avoiding a knotted mess. This can easily be done by winding the wool around the back of two chairs. The length of the loop doesn’t matter, but as a general rule of thumb, the more yarn you have the longer the loop you should make.
Skip this step if you are not using yarn. To dye yarn, you much wind the yarn into a ‘hank’ or loop of wool to ensure even dyeing while avoiding a knotted mess. This can easily be done by winding the wool around the back of two chairs. The length of the loop doesn’t matter, but as a general rule of thumb, the more yarn you have the longer the loop you should make.

The loop of yarn must then be secured by loosely tying short bits of yarn in several places. If you tie it too tightly, the dye won’t be able to penetrate the wool and you will end up with a tie dye effect (which can be quite nice if that is what you are going for).
Step 2. Soak the wool
![]() The first thing you need to do is soak the wool over night in fresh water, this will allow the fibers to take up the alum mordant evenly which will then bind the turmeric pigment to the wool.
The first thing you need to do is soak the wool over night in fresh water, this will allow the fibers to take up the alum mordant evenly which will then bind the turmeric pigment to the wool.

Tip: If you’re using raw wool, you will need to clean the dirt and lanolin oil out of the wool before dyeing it.
Step 3. How to make alum mordant
Note: The equipment and chemical used in this process are non-toxic and safe. However, if you are interested in doing more dyeing, I recommend dedicating a saucepan and some utensils to this activity, which you will not use for cooking with. You may also want to wear rubber gloves to protect your skin from the mordant and dye.
![]() The next day you will need to prepare the mordant. Take 10% the weight of your fiber (WOF) and use this measurement as the amount of alum powder you will need.
The next day you will need to prepare the mordant. Take 10% the weight of your fiber (WOF) and use this measurement as the amount of alum powder you will need.

Add half a teaspoon of cream of tarter put it in a saucepan and add 2 – 3 cups of boiling water, mix to dissolve.

Then fill the saucepan with cold water until it is three quarters full. You want the temperature of the mordant solution to be the same temperature as the wet wool.
![]() Warning: If the liquid in one was hot and the other was cold, the change in temperature from one to the other would shock the wool fibers, which would then cause them to felt. We really want to avoid felting the wool during the dyeing process, so this is one important rule to follow throughout.
Warning: If the liquid in one was hot and the other was cold, the change in temperature from one to the other would shock the wool fibers, which would then cause them to felt. We really want to avoid felting the wool during the dyeing process, so this is one important rule to follow throughout.
Step 4. Mordant the wool
![]() Place the wet wool into the mordant solution and place on the stove. Very slowly bring to a gently simmer (don’t boil). Do this over the course of half an hour or so, we don’t want to do it too quickly or it will shock the fibers. While the wool it in the pot do not disturb it, and agitation from stirring or prodding with felt the wool.
Place the wet wool into the mordant solution and place on the stove. Very slowly bring to a gently simmer (don’t boil). Do this over the course of half an hour or so, we don’t want to do it too quickly or it will shock the fibers. While the wool it in the pot do not disturb it, and agitation from stirring or prodding with felt the wool.
Simmer gently for an hour. Then turn off the heat and leave the wool to soak over night. Remember, do not touch the wool while it is hot.

Note: Without using a mordant like alum, the turmeric pigment will washout much sooner than if you didn’t mordant the wool first. So although many source will say not to bother with a mordant for turmeric dye, it will increase the lifespan of the colour of your wool.
 If you would prefer to use a more natural mordant, rhubarb leaves will do the trick. Check out these instructions to find out how.
Step 5. Prepare the dye bath
Tip: Turmeric will stain your hands and clothes, so I suggest wearing an apron and gloves during this process.
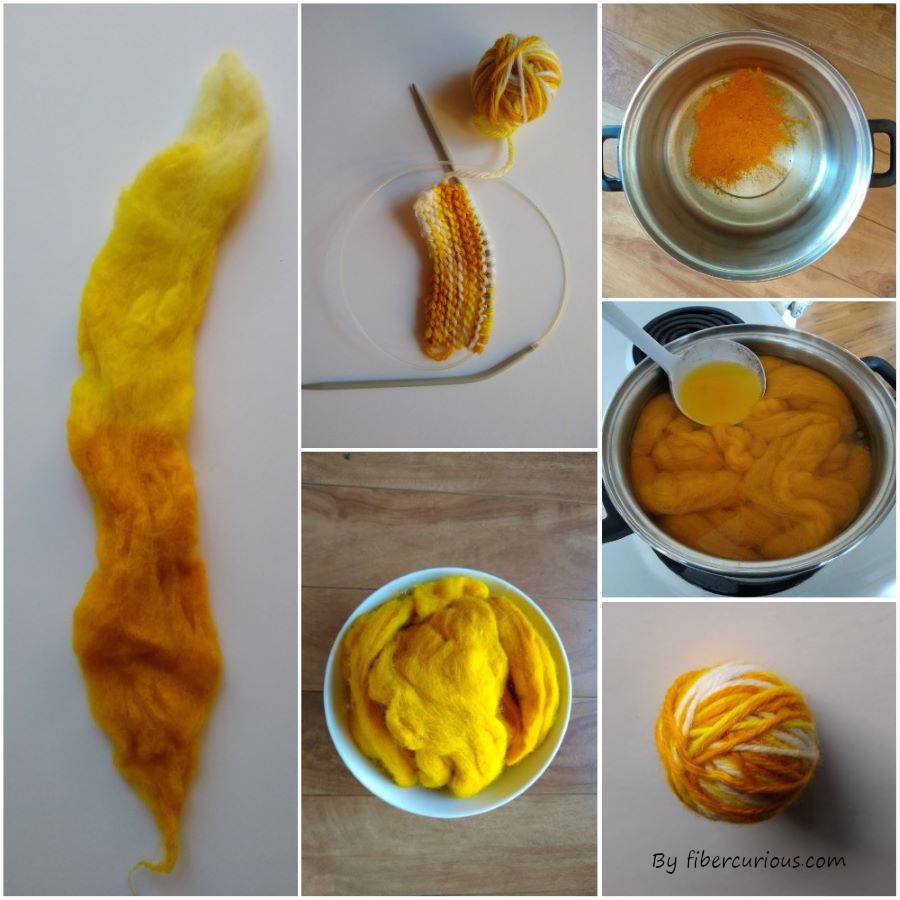
![]() The next day, prepare the turmeric dye bath. Measure half an ounce of turmeric powder into your dye pot (remove the wool first and ditch the mordant solution). Then fill the pot about three quarter full with water and simmer it for an hour so the turmeric dissolves into the water.
The next day, prepare the turmeric dye bath. Measure half an ounce of turmeric powder into your dye pot (remove the wool first and ditch the mordant solution). Then fill the pot about three quarter full with water and simmer it for an hour so the turmeric dissolves into the water.

Step 6. Strain the dye solution
 The powder won’t dissolve but the dye will leach out into the water. To get rid of the turmeric powder it is important to strain it. If you don’t strain it, your wool will end up with grainy bits of turmeric in it.
To strain, place a colander over a bucket and line the colander with gauze (warning- it will become stained). Then slowly pour your dye solution into the bucket. The gauze will act as a first level of filtration, however, you need to repeat the process using a finer mesh. I used a tea towel, this second filter removes the finer particles. If you skip using the step using the gauze filter your tea towel will become clogged and cause problems, so it is advisable to do both.

Step 7. Dye the wool
![]() Now the turmeric dye is ready to use. Take the mordanted wool and place it in the dye pot, remember the dye solution and your wool should be the same temperature. Just like the pre-mordant process, bring it very slowly to a gently simmer. Simmer for about an hour and then let is soak over night. The longer the wool has to soak, the more vibrant the colour will be.
Now the turmeric dye is ready to use. Take the mordanted wool and place it in the dye pot, remember the dye solution and your wool should be the same temperature. Just like the pre-mordant process, bring it very slowly to a gently simmer. Simmer for about an hour and then let is soak over night. The longer the wool has to soak, the more vibrant the colour will be.

Step 8. Dry and cure the wool
Tip: Don’t dump your dye solution until the wool has cured and you’ve rinsed it. If you aren’t happy with your results, you can pop the wool back in the dye bath and try again.
Then, take your wool, wring it out and hang it up to dry in the shade (the sun may bleach it). Once it is dry, let is cure for a few days before rinsing it. This will help the pigment to bind to the wool fibers before washing it. To cure it, keep it in a dry ventilated place away from direct sunlight.
Step 9. Rinse the wool
![]() Once it is cured, you need to rinse out in cold water and a pH neutral soap to get rid of the loose dye pigment. You will lose a lot of dye but the colour of the wool shouldn’t change much. Rinse for about 10 to 15 minutes until all the grainy bits are out of the wool and the water runs clear. Then hang it up again to dry.
Once it is cured, you need to rinse out in cold water and a pH neutral soap to get rid of the loose dye pigment. You will lose a lot of dye but the colour of the wool shouldn’t change much. Rinse for about 10 to 15 minutes until all the grainy bits are out of the wool and the water runs clear. Then hang it up again to dry.
![]() Now your wool is ready to use!
Now your wool is ready to use!

 To increase the colour fastness of the turmeric dyed wool, dye the wool with pomegranate first. For detail on how to do this, check out Dyeing with pomegranate.
Colour variations using post-dyeing mordants
![]() You can modify the colour of your dye bath by using mordants such as iron, copper, and tin. Iron and copper are the easiest mordants to get a hold of as they can easily be made by placing a few bit of iron or copper in a vinegar solution and let dissolve for a few days. If you would prefer to buy a mordant, you can get them here. Once your mordant is made, add a few tablespoons to your dye bath before adding the wool.
You can modify the colour of your dye bath by using mordants such as iron, copper, and tin. Iron and copper are the easiest mordants to get a hold of as they can easily be made by placing a few bit of iron or copper in a vinegar solution and let dissolve for a few days. If you would prefer to buy a mordant, you can get them here. Once your mordant is made, add a few tablespoons to your dye bath before adding the wool.
![]() Warning: Iron and copper mordants should be handled carefully using gloves, you don’t want to come in contact with it.
Warning: Iron and copper mordants should be handled carefully using gloves, you don’t want to come in contact with it.
Creating ombre yarn using tumeric
![]() Ombre yarn is yarn with patches of colour throughout the skein of yarn. The length of the dyed patch on the yarn depend on you big make your hank of wool and how much of the hank is submerged in the dye. To create ombre yarn there are a few things you need to do differently to the above process. Firstly, when soaking the yarn over night and simmering it in mordant, only do this for half the hank of yarn. To do this, hang the yarn up while it is soaking or simmering. I use a nail above my stove top to tie it up.
Ombre yarn is yarn with patches of colour throughout the skein of yarn. The length of the dyed patch on the yarn depend on you big make your hank of wool and how much of the hank is submerged in the dye. To create ombre yarn there are a few things you need to do differently to the above process. Firstly, when soaking the yarn over night and simmering it in mordant, only do this for half the hank of yarn. To do this, hang the yarn up while it is soaking or simmering. I use a nail above my stove top to tie it up.

Then dye the same way, with the hank of yarn tied up. You can also make graded tones in your roving this way too.

Tip: If you would like a hard line between the white yarn and the dye keep the yarn tied up at the same height. If you would like more of a graded colour tones, from intense colour to white, slowly pull the wool up out of the dye bath by making the string holding it up shorter.
After you have dyed the yarn and left it to soak. Carefully wring it out so the dye that is washed out doesn’t run into the white yarn. Then hang it up to dry and cure it for a few days.

Once it is cured, give it a good wash with soapy water. Let it dry again and then wind it up into a ball.

![]() Warning: As I mentioned before, turmeric is not colour fast, so eventually the yellow dye will fade. Once your yarn is used for a knitting project it will be impossible to re-dye it with the ombre effect again. You can, however, re-dye the whole item with turmeric to revive the colour, but it will be a solid yellow.
Warning: As I mentioned before, turmeric is not colour fast, so eventually the yellow dye will fade. Once your yarn is used for a knitting project it will be impossible to re-dye it with the ombre effect again. You can, however, re-dye the whole item with turmeric to revive the colour, but it will be a solid yellow.
Ideas for using your natural dyed turmeric wool
 Try making a felted soap bar from your turmeric wool. Turmeric conveys antimicrobial and antibacterial properties to the felted soap for increased hygiene in your home!

Dyeing plant fibers with turmeric
![]() Other plant based materials like cotton and linen can also be dyed using turmeric. However, they need to be pre-boiled in washing soda first to remove chemicals in the material from the manufacturing process. Linen is often treated with an anti-wrinkle chemical which inhibits the binding of natural dye. For this reason, using organic cotton and linen is recommended. After boiling them, rinse them out and mordant them with alum as described in this tutorial, or you can try rhubarb leaves or soy milk as other mordant alternatives that work well for plant fibers.
Other plant based materials like cotton and linen can also be dyed using turmeric. However, they need to be pre-boiled in washing soda first to remove chemicals in the material from the manufacturing process. Linen is often treated with an anti-wrinkle chemical which inhibits the binding of natural dye. For this reason, using organic cotton and linen is recommended. After boiling them, rinse them out and mordant them with alum as described in this tutorial, or you can try rhubarb leaves or soy milk as other mordant alternatives that work well for plant fibers.
If you plan on dyeing linen with turmeric check out some of Kat’s tips and issues she faced with her turmeric dyeing experiments.
Books on natural dyeing
 If you’re looking for a book to learn more about the art of natural dyeing, why not pick up one of these great resources. The Art and Craft of Natural Dyeing offers many natural dyeing recipes, Wild Color will guide you through the entire dyeing process, and Harvesting Color will teach you how to foraging for plants and make them into natural dyes.


Be the first to leave a comment